Expanding the Project (Following Model, View, Controller) - Joomla
We will recode the component to follow the Model, View, Controller
(MVC) design. Many programmers use MVC as a predictable way of controlling
the logic flow in software. Models are used to define the different ways in which
data can be accessed. Views generate output when given data. Controllers receive
commands and route the software to the corresponding tasks and views.
In our MVC implementation, we will create data models to represent information
from the database, views to display our data, and controllers that will merge the two
together and handle any other task.
- Building Data Models
get the information we will display. The front end of the component has two main
screens: one that displays all the reviews and another that displays a single review.
Both of these will need at least one model.
- Modeling All Reviews
folder, create the all.php file and add the following code:
defined( '_JEXEC' ) or die( 'Restricted access' );
jimport( 'joomla.application.component.model' );
class ModelReviewsAll extends JModel
{
var $_reviews = null;
function getList()
{
if(!$this->_reviews)
{
$query = "SELECT * FROM #__reviews WHERE published = '1'";
$this->_reviews = $this->_getList($query, 0, 0);
}
return $this->_reviews;
}
}
?>
- Modeling Individual Reviews
individual reviews. In the models folder, create the review.php file and add the
following code:
defined( '_JEXEC' ) or die( 'Restricted access' );
jimport( 'joomla.application.component.model' );
class ModelReviewsReview extends JModel
{
var $_review = null;
var $_comments = null;
var $_id = null;
function __construct()
{
parent::__construct();
$id = JRequest::getVar('id', 0);
$this->_id = $id;
}
function getReview()
{
if(!$this->_review)
{
$query = "SELECT * FROM #__reviews WHERE
id = '" . $this->_id . "'";
$this->_db->setQuery($query);
$this->_review = $this->_db->loadObject();
if(!$this->_review->published)
{
JError::raiseError( 404, "Invalid ID provided" );
}
}
return $this->_review;
}
function getComments()
{
if(!$this->_comments)
{
$query = "SELECT * FROM #__reviews_comments WHERE
review_id = '" . $this->_id . "'";
$this->_comments = $this->_getList($query, 0, 0);
}
return $this->_comments;
}
}
?>
- Migrating to Views
information. So far, the files ending in .html.php have served us well for doing this
task. However, the existing design is rather rigid: you include the HTML output
class and call the screen you want to display. Through the use of views, we can open
these screens up to the admins as choices.
Rather than keeping the entire output within a single file, we will create a separate
folder for views, which will contain sub-folders for the different types of records we
want to present. Within /components/com_reviews, create the views folder. At the
moment, our component has functions for displaying single reviews and comments;
so create two folders under views titled all and review. In each of these folders,
create a folder for templates titled tmpl.
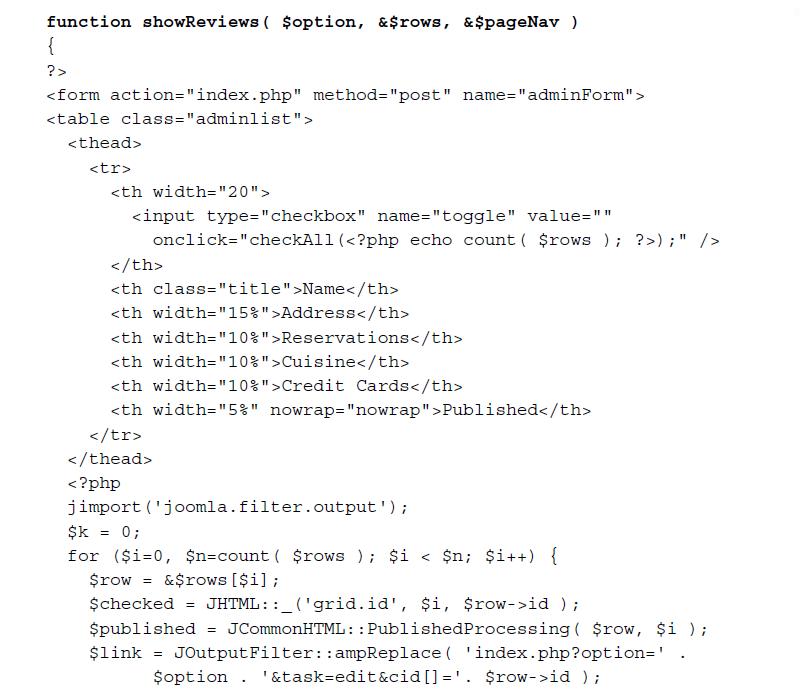
- Viewing All
templates. To make this object for the all reviews view, create the view.html.php file
under components/com_reviews/views/all and add the following code:
defined( '_JEXEC' ) or die( 'Restricted access' );
jimport('joomla.application.component.view');
class ReviewViewAll extends JView
{
function display($tpl = null)
{
global $option;
$model = &$this->getModel();
$list = $model->getList();
for($i = 0; $i < count($list); $i++)
{
$row =& $list[$i];
$row->link = JRoute::_('index.php?option=' . $option .
'&id=' . $row->id . '&view=review');
}
$this->assignRef('list', $list);
parent::display($tpl);
}
}
?>
After importing the core view code and declaring ReviewViewAll as an extension
of JView, we create a member function display() that accepts the name of the
template we wish to use. We get the model currently assigned to this view and
use the getList() member function to get our set of reviews. Before heading to
display the template, we go through these records and add a preformatted link using
JRoute::_() to make them search-engine friendly. We then assign this list as a
template variable and call our template. If no template name is specified, default is
assumed. To create the default template, in components/com_reviews/views/all/
tmpl create default.php and add the following code:
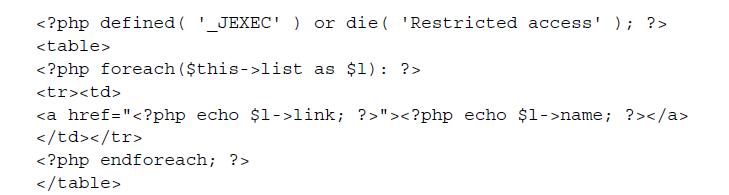
- Viewing One
the reviews. In components/com_reviews/views/review create view.html.php
and add the following code:
defined( '_JEXEC' ) or die( 'Restricted access' );
jimport('joomla.application.component.view');
class ReviewViewReview extends JView
{
function display($tpl = null)
{
global $option, $mainframe;
$model = &$this->getModel();
$user =& JFactory::getUser();
$review = $model->getReview();
$comments = $model->getComments();
$pathway =& $mainframe->getPathWay();
$backlink = JRoute::_('index.php?option=' .
$option . '&view=all' );
$review->review_date =
JHTML::Date($review->review_date);
if($review->smoking == 1)
{
$review->smoking = "Yes";
}
else
{
$review->smoking = "No";
}
for($i = 0; $i < count($comments); $i++)
{
$row =& $comments[$i];
$row->comment_date =
JHTML::Date($row->comment_date);
}
$pathway->addItem($review->name, '');
$this->assignRef('review', $review);
$this->assignRef('comments', $comments);
$this->assignRef('backlink', $backlink);
$this->assignRef('option', $option);
$this->assignRef('name', $user->name);
parent::display($tpl);
}
}
?>
A link back to the main page is also created and assigned to the view. We
finally display the chosen template after all the variables have been assigned. In
components/com_reviews/views/review/tmpl create default.php and add the
following code:

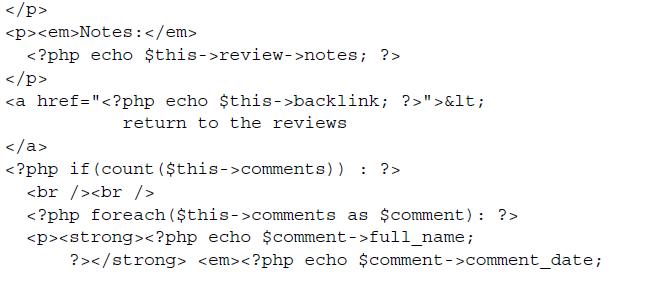
to output variables. The name, review_date, quicktake, address, cuisine,
credit_cards, reservations, smoking, review, and notes are all merely echoed
out. The backlink is embedded in an anchor
comments, we first check to make sure that we have at least one. If so, we go through
the comments array, displaying the full_name, comment_date, and comment_text
for each comment. Notice that at the bottom we have a call to load another template
for rendering the comments form. This allows us to keep the presentation logic for
the review itself separate from the form.
However, we need to add this other template as well. In com_reviews/views/
review/tmpl create default_form.php and add the following code:

- Switching Through Controllers
following code:

We finally have all the data models, views, and the controller necessary to run
the component as a model-view-controller style application. All that's left is the
code to execute the controller. Since Joomla! first executes reviews.php when the
component is run, we will have to modify the code in it to use the controller instead
of using the old switching system. Open /components/com_reviews/reviews.php
and replace the existing code with the following:
defined('_JEXEC') or die('Restricted access');
require_once( JPATH_COMPONENT.DS.'controller.php' );
JTable::addIncludePath(JPATH_ADMINISTRATOR.DS.'components'.DS.
'com_reviews'.DS.'tables');
echo '
Restaurant Reviews
';$controller = new ReviewController();
$controller->execute( JRequest::getVar( 'task' ) );
$controller->redirect();
?>
After creating a new object of the ReviewController class, we call the execute()
member function, passing in the task requested by the user. If no task is defined, the
display() member function will be called. Otherwise, the name of the task will be
matched to a member function of the component. This way, you can add tasks to the
controller without also adding them to a lengthy switch() statement.
- Updating Links and Routes
to code we wrote earlier in our module. The view review must be specified in the
generated links. In /modules/mod_reviews/helper.php, replace the line where
$link is set with this code:
$link = JRoute::_("index.php?option=com_reviews&view=review&id=" .
$review->id);
Next, we need to update the router to use the view variable when building and
parsing links. Open /components/com_reviews/router.php and change the
highlighted code in ReviewsBuildRoute(), replacing the code that previously
processed task:
function ReviewsBuildRoute(&$query)
{
$segments = array();
if (isset($query['view'])) {
$segments[] = $query['view'];
unset($query['view']);
}
if(isset($query['id']))
{
$segments[] = $query['id'];
unset($query['id']);
}
return $segments;
}
Since we are no longer using task in our navigational links, we no longer need to
include it when building or parsing a SEF link. For updating ReviewsBuildRoute(),
this was a simple change from task to view. However, ReviewsParseRoute() will
need a bit of rewriting because we now have a situation where we might have 0, 1,
or 2 extra segments instead of just 0 or 2. The all view is not accompanied by an id,
so we need to adjust the parser to count the segments before attempting to set both
view and id. Replace ReviewsParseRoute() with the code below:
function ReviewsParseRoute($segments)
{
$vars = array();
$vars['view'] = $segments[0];
if (count($segments) > 1)
{
$vars['id'] = $segments[1];
}
return $vars;
}
In this version of the function, we set initialize the $vars array and then set
$vars['view'] to the first element of $segments. If there's more than one element in
$segments, we assume the second is an id and we set $vars['id'] with it. Finally,
we return $vars. Our links to the review listing will look like http://www.oursite.
com/reviews/all, while links to individual reviews will look like http://www.
oursite.com/reviews/review/2.
- Reorganizing the Back-End Code
We can reuse most of the existing code, while gaining the benefit of not maintaining
a switch() statement. In /administrator/components/com_reviews create the
controller.php file and add the following code:


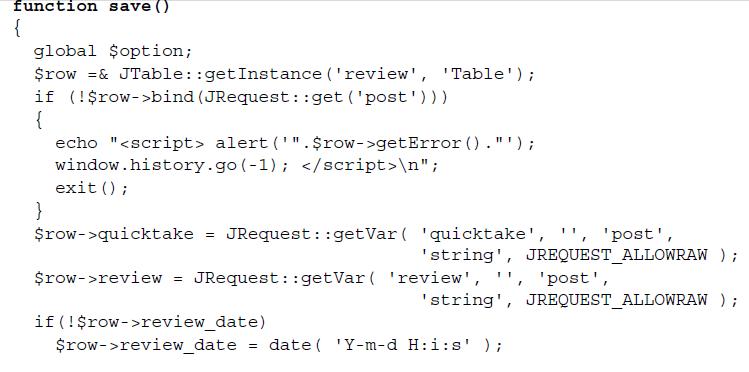


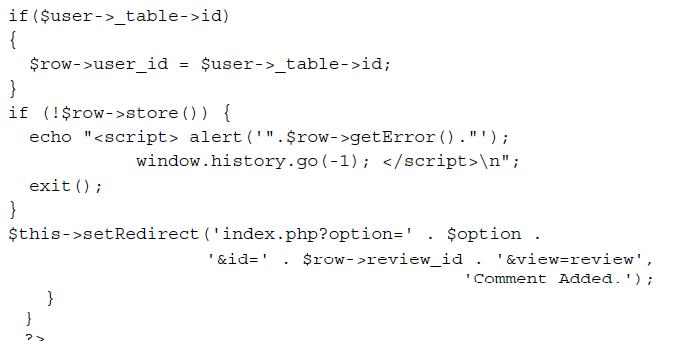
This controller overrides the constructor, registers the add task with edit(), and
applies the changes with save(). When save() is called, it can check $this->_task
to find which task triggered the function call and also use the information to redirect
the user appropriately.
At this point, we've elected to leave the current admin.reviews.html.php file in
place without migrating to views. The back-end views benefit less from the new
view architecture than the front-end code does; the back end does not need extensive
control over the output format.
We now need to change admin.reviews.php to use the controller. Open this file and
replace the code with the following:
defined( '_JEXEC' ) or die( 'Restricted access' );
require_once( JApplicationHelper::getPath( 'admin_html' ) );
require_once( JPATH_COMPONENT.DS.'controller.php' );
JTable::addIncludePath(JPATH_COMPONENT.DS.'tables');
$controller = new ReviewController(
array('default_task' => 'showReviews') );
$controller->execute( JRequest::getVar( 'task' ) );
$controller->redirect();
?>
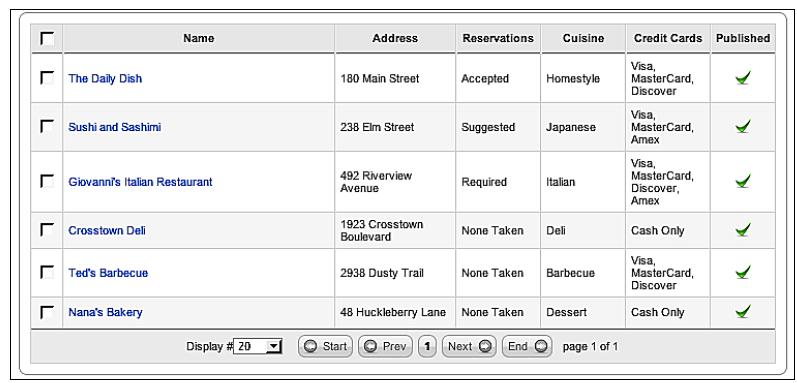
- Publishing Controls for Reviews
where the admins would be able to select an existing review for editing. At the far
right‑hand side of this screen, there is a column titled Published, which shows the
current publishing status of each review.
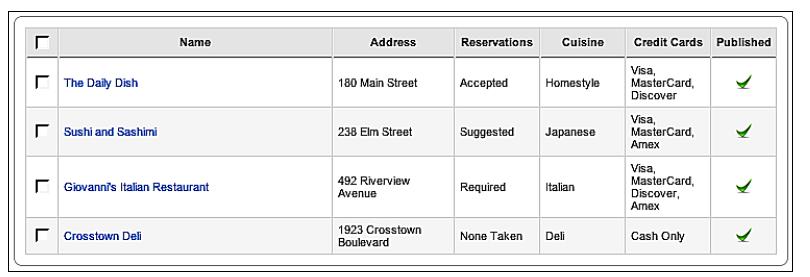
The 'check' icons in this column are actually buttons that are designed to toggle
between publishing and unpublishing the reviews. If you click on one of these
buttons now, the 'check' icon still remains as we have not yet added the code to make
this functional. The Publish and Unpublish buttons on the toolbar are also currently
non-functional. To fix this, we will add the function publish() to the back-end
controller and register the unpublish task with it:
function __construct( $default = array() )
{
parent::__construct( $default );
$this->registerTask( 'add' , 'edit' );
$this->registerTask( 'apply', 'save' );
$this->registerTask( 'unpublish', 'publish' );
}
function publish()
{
global $option;
$cid = JRequest::getVar( 'cid', array(), '', 'array' );
if( $this->_task == 'publish')
{
$publish = 1;
}
else
{
$publish = 0;
}
$reviewTable =& JTable::getInstance('review', 'Table');
$reviewTable->publish($cid, $publish);
$this->setRedirect( 'index.php?option=' . $option );
}
After saving this code, you should be able to click on the check mark to toggle the
publishing of any reviews in the back-end list.

- Adding Pagination
lengthy, it would be helpful if we break this up into several screens so that they're
easier to manage. Something like the search engines, which typically show ten or
twenty results at a time. The functionality and interface for this is built into Joomla!
and quick to add. To start, we'll add pagination to the review manager in the back
end. The listings of reviews will appear across multiple pages and links will be
generated to navigate between them. Open /administrator/components/com_
reviews/controller.php and make the highlighted additions and modifications to
the showReviews() member function:
function showReviews()
{
global $option, $mainframe;
$limit = JRequest::getVar('limit',
$mainframe->getCfg('list_limit'));
$limitstart = JRequest::getVar('limitstart', 0);
$db =& JFactory::getDBO();
$query = "SELECT count(*) FROM #__reviews";
$db->setQuery( $query );
$total = $db->loadResult();
$query = "SELECT * FROM #__reviews";
$db->setQuery( $query, $limitstart, $limit );
$rows = $db->loadObjectList();
if ($db->getErrorNum()) {
echo $db->stderr();
return false;
}
jimport('joomla.html.pagination');
$pageNav = new JPagination($total, $limitstart, $limit);
HTML_reviews::showReviews( $option, $rows, $pageNav );
}
Finally, we import the library that generates pagination HTML and get a
JPagination class instance set with our range and total. This object is passed along
to HTML_reviews::showReviews(), which needs to be modified to make use of the
object. Open admin.reviews.html.php and pull up the showReviews() member
function. Only the two small modifications highlighted below are necessary to
display the pagination:

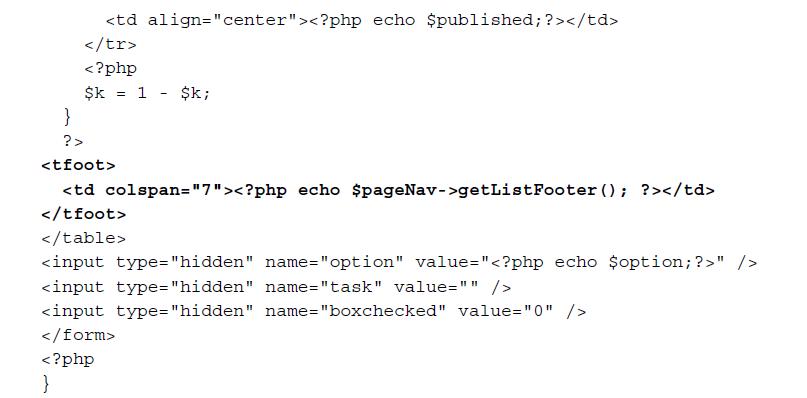
The call to the getListFooter() member function of $pageNav returns HTML for
links to each of the pages of review listings. The current page is highlighted, but not
linked. A dropdown controlling the number of reviews to display per page is also
returned. When you pull up the list in the back end, your screen should look similar
to the following. You may wish to add some reviews so that you have at least six.
- Management for Comments
Unfortunately, websites offering comments are frequently abused. We need to
build a back-end manager where comments can be removed or edited. Before we
actually start writing code, we need to go back to the database to add a menu item
underneath the Restaurant Reviews link in the Components menu.
To create this insert query, we need to get the id for the current back-end component
link. If you're using a command-line SQL client and your database table prefix is
jos_, enter the following query:
SELECT id FROM jos_components WHERE link = 'option=com_reviews';
If you are using phpMyAdmin, browse the jos_components table until you find the
row for Restaurant Reviews and note the value in the id column.
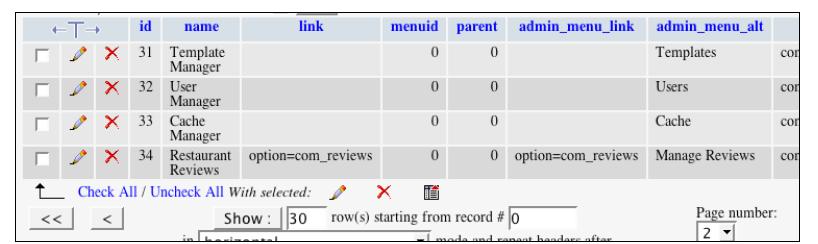
Once you have a value for id, enter the following query in your SQL client,
substituting 34 with the id in your system if necessary:
INSERT INTO jos_components (name, parent, admin_menu_link,
admin_menu_alt, ordering)
VALUES ('Manage Comments', 34,
'option=com_reviews&task=comments', 'Manage Comments', 1);
If you're using phpMyAdmin, an insert screen for jos_components should look like
the following:

When you refresh the back end and move the cursor over the menu options, you
should notice a new submenu link along with a link above the component display:

Now that the link is in place, let's add a screen for the link to point to. In
/administrator/components/com_reviews/controller.php, add the
following function:
function comments()
{
global $option, $mainframe;
$limit = JRequest::getVar('limit',
$mainframe->getCfg('list_limit'));
$limitstart = JRequest::getVar('limitstart', 0);
$db =& JFactory::getDBO();
$query = "SELECT count(*) FROM #__reviews_comments";
$db->setQuery( $query );
$total = $db->loadResult();
$query = "SELECT c.*, r.name FROM #__reviews_comments
AS c LEFT JOIN #__reviews AS r ON r.id = c.review_id ";
$db->setQuery( $query, $limitstart, $limit );
$rows = $db->loadObjectList();
if ($db->getErrorNum())
{
echo $db->stderr();
return false;
}
jimport('joomla.html.pagination');
$pageNav = new JPagination($total, $limitstart, $limit);
HTML_reviews::showComments( $option, $rows, $pageNav );
}
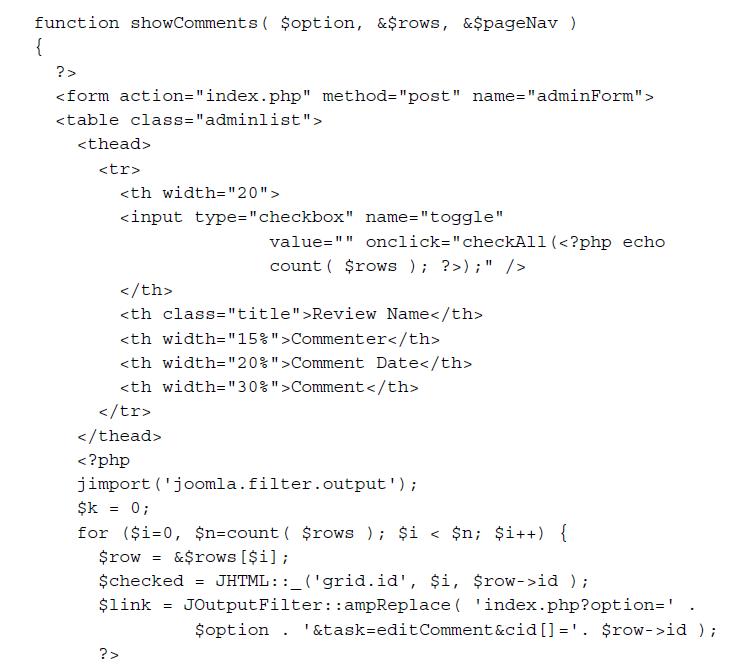
This function is similar to the showReviews() function, except that we're combining
the reviews table into the comments table. We end it by calling HTML_reviews::
showComments(); we will need to code this as well. Open admin.reviews.html.
php and add the following code to the class:

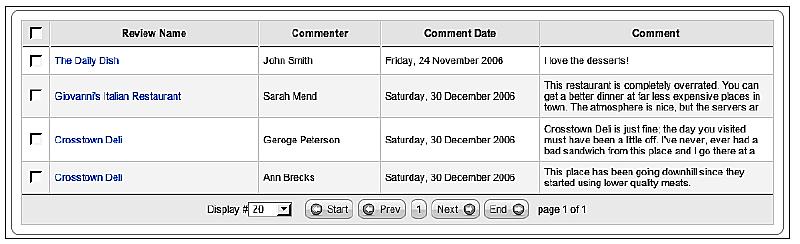
Now that this code is in place, follow one of the Manage Comments links. Your list
should look similar to the following:
We still need to build functions for editing, saving, and deleting comments. Add the
following functions to the back-end controller:


These functions are similar to the ones used for editing, saving, and removing
reviews. The main difference is that we do not need to modify any of the data
before storing our comments and also we need not build any HTML elements for
the output class to display. The editComment() function calls HTML_reviews::
editComment() which also needs to be built. Open admin.reviews.html.php and
add the following function:


Once all of this code is in place, click on a link to one of the comments in the back
end and a screen similar to the following should appear:

- Additional Toolbars
If you try to use any of the toolbars in place at the moment on any of the comment
administration screens, you won't get the results you are expecting. This is because
the buttons are still pointing to the tasks for reviews. To fix this, we will need to
create some new toolbars for the comments. Open /administrator/components/
com_reviews/toolbar.reviews.html.php and add the following class:
class TOOLBAR_reviews_comments
{
function _EDIT()
{
JToolBarHelper::save('saveComment');
JToolBarHelper::cancel('comments');
}
function _DEFAULT()
{
JToolBarHelper::title( JText::_( 'Comments' ), 'generic.png' );
JToolBarHelper::editList('editComment');
JToolBarHelper::deleteList('Are you sure you want to remove
these comments?', 'removeComment');
}
}
The first parameter in the calls to the save(), cancel(), and editList() member
functions of JToolBarHelper overrides the default task, allowing us to redefine
them with our own. The call to title() allows us to use the left-hand portion of
the menu bar for identifying the screen, as we did with the toolbar for managing
reviews. Finally, the call to deleteList() takes a confirmation message as the first
parameter and the desired task as the second. The confirmation message is displayed
when boxes are checked to ask the user to confirm before proceeding with the
deletion task.
To display these toolbars, we need to modify the switch() in toolbars.reviews.
php that we created in previous part . The additional code is highlighted below:
switch($task)
{
case 'edit':
case 'add':
TOOLBAR_reviews::_NEW();
break;
case 'comments':
case 'saveComment':
case 'removeComment':
TOOLBAR_reviews_comments::_DEFAULT();
break;
case 'editComment':
TOOLBAR_reviews_comments::_EDIT();
break;
default:
TOOLBAR_reviews::_DEFAULT();
break;
}
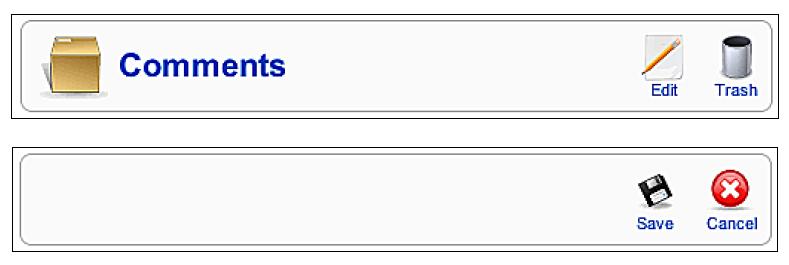
You should now see the toolbars below for the list and edit screens, respectively.
These should work only on the comments and should not interfere with the
functionality of the reviews management.
Enjoy!!!!! MVC...
Expanding the Project (Following Model, View, Controller) - Joomla
 Reviewed by Web Technology Funda
on
4:13:00 AM
Rating:
Reviewed by Web Technology Funda
on
4:13:00 AM
Rating:
Reviewed by Web Technology Funda
on
4:13:00 AM
Rating:

No comments